Step 1:
Click on the link to download the .pdf template for the pop-up Christmas Tree:
Step 2:
Print out both pages from the template onto heavy paper, such as card stock or construction paper.

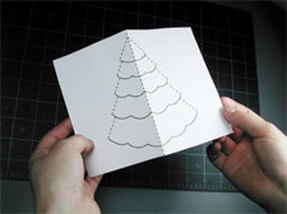
Step 3:Lay the card that has the outline of the tree on a flat surface. Take a ruler and line the edge of it up against the center fold line of the card.
|

Step 4:Use the rounded end of paper clip (or a ballpoint pen that has run out of ink) and press it along the dotted line carefully scoring the card all the way from top to bottom. Score all the other dotted lines on the card as well.
|

Step 5Cut the card out carefully following the solid, black lines around the edges.
|
Step 6:Begin to fold the card in half, keeping the outline of the tree on the OUTSIDE so you can always see it.
|
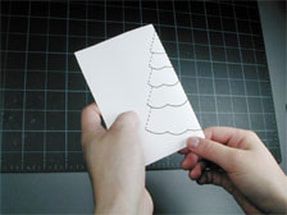
Step 7:Fold the card completely in half with the outline of the tree still visible.
|

Step 8:Carefully cut along the SOLID black line of the first segment at the top of the tree.
|

Step 9:Fold the first segment at the top to the tree back against the card, along the dotted line, and crease with your thumb or finger.
|

Step 10:Put the first segment back to its original position.
|
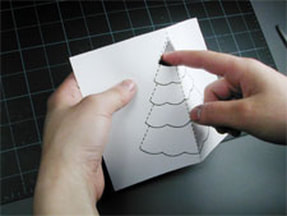
Step 11:Open the card like a tent, and push the first segment through to the other side.
|

Step 12If you turn the card over, this is what it looks like.
|

Step 13Turn the card over again and carefully cut along the SOLID black line of the second segment at the top of the tree.
|

Step 14Fold the second segment at the top to the tree back against the card, along the dotted line, and crease with your thumb or finger.
|

Step 15:Put the second segment back to its original postion.
|

Step 16:Open the card like a tent, and push the second segment through to the other side.
|

Step 17:If you turn the card over, this is what it looks like.
|

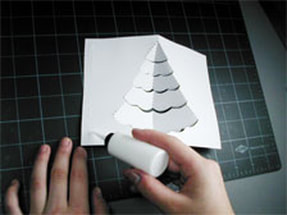
Step 18:Turn the card back over again and repeat the same process of cutting along the solid black lines, folding the segment and pushing them through to the other side. When you have done all five segments the card will look like this.
|

Step 19:Set the Christmas tree card aside and lay the second print out, the backing card, on a flat surface. Take a ruler and line the edge of it up against the center fold line of the backing card and score down the center with your paper clip.
|

Step 20:Cut the backing card out carefully following the solid, black lines around the edges.
|

Step 21:Fold the backing card in half with the dotted line on the INSIDE. Set this card aside.
|

Step 22:Take the Christmas tree card turn it over so the dotted outline is visible. Put a thin line of glue along the right side of the card from top to bottom.
|
Step 23:Put a thin line of glue along the left side of the card from top to bottom
|

Step 24:Take the backing card, with the dotted line facing down, and carefully position it on top of the Christmas tree card. Take your time, making sure the edge of both cards match up.
|

Step 25:Press the card together, flattening them completely.
|

Step 26Turn the card over, carefully close and open it. Your pop-up Christmas Tree card is ready to be decorated!
|

|
|
|